I visited Eric Jensen in his studio in Irving Park recently. As one of the original founders of Lillstreet Art Center, Eric taught at Lillstreet for 15 years and also at Evanston Art Center for nearly 10 years. Sharing studio space with Ed Hinkley (with whom I have studied for the past 2 years), Eric currently sells his ceramic art wholesale to retailers and small business owners. With an MFA in ceramics and more than 20 years of professional experience, Eric continues to experiment and learn how to "perfect" his creative techniques. He demonstrated his version of printing on ceramics.
Creating a Printed Vessel

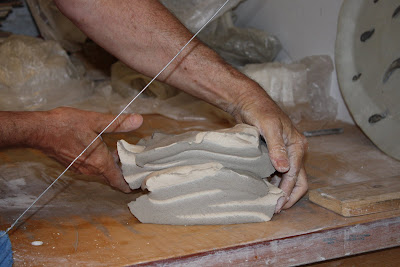
Mix stoneware and porcelain together until the clay
is smooth and has an even consistency.

Final mixed stoneware and porcelain slab

Transfer a photographic image onto a silkscreen with
a removable frame. (The color of the dried emulsion
is red in this photo. The white areas are where the
"ink" will go through.)
Prepare a silkscreen: In a darkroom, put photo
emulsion on 140 mesh screen on a removable frame
and then dry the screen. Using a bright light
source and glass, expose the screen to a high
contrast b&w photocopied image on acetate. The
light will harden only the exposed white image
areas on the screen and will not affect the dark
areas. When you wash the screen after exposure,
just the dark image areas will wash away, and this
is where the "ink" will go through the screen.
Dry the screen and remove the frame.)

Roll out a porcelain slab about 1/16" thick and the
size of the screened image.

Prepare colored porcelain slip with black mason
stain added by pushing the mixture through a 100-
mesh screen to get out large particles. Put the
screen on the porcelain slab, wet it a little, and
then paint the mixture on the screen with a brush.

Lift the screen off the porcelain slab.

Screenprinted porcelain

After drying the screenprinted porcelain, put it on top
of the previously mixed porcelain / stoneware slab.

Put newspaper on top and press down on the surface
with a small squeegee.

Screenprinted porcelain attached to porcelain /
stoneware slab.

Stretch the clay lifting and throwing it down until the
entire slab is about 1/4" thick (do this about 4 times).

Cut the slab in half to create the main sides of the
vessel.

Use the porcelain / stoneware slab to create two
smaller sides and a bottom for the vessel. Start
to attach the sides of the vessel, which is now
lying horizontally on its side.

Insert mailing bubbles inside of the vessel to
provide support and attach the second screen
printed side.

Move the vessel to a horizontal position.

The vessel was dried, fired in a kiln to harden it,
glazed and then fired again at a high temperature.
The feet were attached after the final firing.

Second screenprinted vessel drying on a shelf

Second screenprinted vessel in its finished state
For more information about Eric and his art, visit http://www.ericjensenceramic.com.
Photo Credit: All photos by Amy A. Rudberg, unless otherwise indicated.

1 comment:
I an an Eric Jensen fan and it is good to see the person and the technique. I have several pieces of his and enjoy them every day. Abolutely beautiful work!
Post a Comment